Orkut Addons Tips
Orkut Addons site is the best place to get the tips and tricks on orkut

Scrap Sender Expander

Posted In: . By BabyFirstYear

Greasemonkey Script: This script expands the Name of the Person, who has scribbled you.

Often you are not able to identify the person, with only his first name after his Display Picture. This script expands that first name and displays both the first and last name. I think that you now have got what function this script performs. If not cry , just read this "Shows Full Name of the person who posted the scrap". The only exception is when the person who has scribbled has No Display Picture. In that case, only his first name is displayed.

Specifications Required: Mozilla Firefox (download from below), Greasemonkey Add-on.

Procedure:

arrowInstall Full Name in Scraps.

Now whenever you will open the scrapbook, you will see the full name of the person instead of only first name. Enjoy! mrgreen
And Happy New Year to all of you. Do Use Our Scrap All to Wish New Year to Your Friends List (in just one click), without any advertisements! biggrin


Credits:
Gultus

Read More..
 

Scrap Friends Lite v5.4

Posted In: . By BabyFirstYear

Greasemonkey Script: Send Scrap to all your friends, with a single click. (that too without advertisements wink )

This great GM script enables you to send same scrap to all your friends, using features like "ideaGroup Creation", "ideaUse of ctrl and shift buttons" etc.

November 23, 2007 Jerry quoted on his blog:

We guess everyone out here is fed up with scrap all spam. Those who once used to scrap all their friends to greet, now have an advertisement below their scraps. No doubt this looks odd and embarrassing. So today, we'll provide you a few tips to disable this advertisement below the scraps.


He provided us with a GM script which was advertisement free, but there was one drawback in that script. It was not able to provide us with the facility of sending scraps to my own defined receipts. Instead it sends the scrap to all of the list. Our script provides you both the facilities, without the hassle of including <script> at the end of your scrap, as pointed out by him in his post. mrgreen

Specifications Required: Mozilla Firefox (download from below), Greasemonkey Add-on.

Procedure:

arrowInstall Scrap All Friends Lite v5.4
arrowLogin to your Orkut Account and visit http://orkut.com/scraps.aspx
arrowFollow the On-Screen Instructions and you are done! wink

Leave any query in comments. We'll surely provide a follow-up.

Read More..
 

Receive Scraps Via SMS

Posted In: . By BabyFirstYear

Orkut Hack: You can now receive Scraps via SMS that too free of cost!

Well, you might be surprised by this new feature. The first question that must be going around in your mind would be " question Why the hell Google is giving out this great feature free of cost!". Let me first clear that this hack has no association with the services provided by Google (apart from your scrapbook and of course Orkut lol )

Specifications Required: Any Indian Network Operated Mobile Phone.


Before Telling you the procedure to implement this hack, let me first tell you what's the mechanism behind this hack. Actually this process is a combination of two steps. First is sending your (new) scraps to someone, who can access your scrapbook. Second is to send those scraps to your mobile phone via SMS. The first step is achieved by Scrapbook Feeds and the second by using a free Feed updater (via SMS) provided by Mytoday.

Procedure:

arrowSMS REG to 09845398453. (Cost=Premium Charges as per operator)
arrowLogin to your Mytoday account using the password that you will receive from them and the user name as you mobile number (the one which you used for SMS biggrin ).
arrowClick Here to manage your SMS Feed Updates.
arrowIn the Name Section, write "Orkut Scrap". (You may opt other Name also)
arrowEnter URL as: "http://www.indian-tv.com/orkut.php?uid=xxxxxxxxxx", where xxxxxxxxxx is your Orkut Profile ID.
arrowPut a before "Send SMS" Option and click on Create.

Limitations:

arrowScraps Come too Late (Approx 5-6 Hours).
arrowWord Limit of Approx 71 Words.
arrowMytoday might not deliver password on first attempt.
arrowYour Scrapbook must be unlocked.

Even though this hack so many limitations, it is worth giving a try. After all everything is free of cost. redface

Update:

This hack stopped working for a while but is now back into motion! Just one change into it. Replace the link
http://www.indian-tv.com/orkut.php?uid=xxxxxxxxxx with http://www.orkutfeeds.com/feed.php?url=yyyyyyyyyy, where yyyyyyyyyy is your Scrapbook link! e.g. http://www.orkut.com/Scrapbook.aspx?uid=17698551115556711909

Special thanks to Rahul Bansal for Orkut Feeds!

Credits:
Sunny

Read More..
 

Contact Us

By BabyFirstYear

Please use this form to send your message to us. We’ll try our best to get back to you soon.

Or you can also E-mail us on oa[dot]addons[at]gmail[dot]com


Read More..
 

By BabyFirstYear

Table of Contents

(from latest to oldest)

Read More..
 

Play Songs in Scrapbook

Posted In: , , . By BabyFirstYear

Make your own SWF files

Many times you might have been shocked by your peers when you visit their scrapbooks. A song or a tone is playing at the background and you have no idea where it is coming from. You also want this in your scrapbook but due to less amount of tutorials on the web you are not able to sort it out how it really works!

This tutorial aims at providing you all the basics and the tools that you need for creating your own personal musical scrapbook!

Tools that you would need: MP3 Steam Creator and nothing else! Please note that I am giving the tutorial only for Mp3 files since 95% of the listeners prefer this format. If you have a file different from Mp3, you have to first convert it into Mp3 by using any of the free converters available on the net.

The Need:

You may have a favorite song that you want to share with your friends or customers etc on the internet. They can listen to music in Internet explorer or Firefox without installing any music player(the key feature of swf file). MP3 Steam Creator is designed for such purpose. It creates streaming Flash audio from mp3 file on the fly.

Procedure (general):

1. Download Mp3 stream creator. Install it.

2. Add your mp3 or wav music files by clicking the “add file” button. Or you can do a search in windows explorer for *.mp3 and drag drop the files into the list box of Mp3 stream creator.

3. In the option tab, you can select the play control style also (no need to change them).

4. Click “Convert” to do the conversion.

5. After conversion is finished, for each mp3 file, there will be three files (Suppose the mp3 file is 1.mp3 then the files are 1.swf, 1.swf.html and 1.swf.ctrl.html).

6. You can open 1.swf.ctrl.html in Internet Explorer of Firefox to see the play control and try playing your music.

7. If step 6 works well, open your own webpage in an html editor, copy the content of 1.swf.ctrl.html and paste them into a place in your webpage so that the play control can be embeded into your page.

8. Finally upload the 1.swf and your modified webpage to your web server.

That is it. You now have a streaming audio player running.

Procedure (Orkut Specific):


1. Follow steps (1 to 5) as above.

2. Upload 1.swf on www.googlepages.com (you can use any other service also - but prefer google).

3. Note the link of the swf file. It would be something like this (http://oa.addons.googlepages.com/1.swf)

4. Now open your scrapbook and scrap yourself the following code.
<embed src="http://oa.addons.googlepages.com/1.swf"> (Replace http://oa.addons.googlepages.com/1.swf with your own swf link)

You are done! You can even scrap the above code to your friend's SB so that when he opens up his SB, he would listen up to your song.

Suggested Reading:
http://orkutaddons.blogspot.com/2008/01/your-voice-in-scrap.html

Read More..
 

GM Errors

Posted In: , . By BabyFirstYear

Now that you all have read Getting Started, here is the post to cater your Error Needs. Well that might sound something really awkward, but many users face errors in Grease Monkey while installing GM scripts.

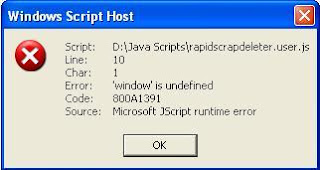
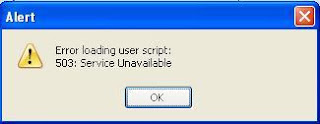
Here is the Screen Shot of four of them, which users have so far reported to me. But these have been solved by now. And here I will be telling you on how to tackle these errors.

(Error 1 Screen Shot)


(Error 2 Screen Shot)


(Error 3 Screen Shot)


(Error 4 Screen Shot)


Error 1: (Screen Shot)

There is nothing that you can do about it, because the GM script has corrupted your Addon. The way out of it is creating a new Profile in Firefox and then again starting everything from the scratch.

What You Have to Do:

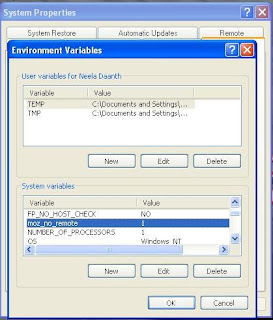
1. Open system properties (by right clicking my computer), choose tab advanced, click to environment variables button. In system variables section, click new. Type this information to each text box. (Screen Shot)

2. variable name: moz_no_remote (must be all small letter)

3. variable value: 1

4. press OK to close all windows.

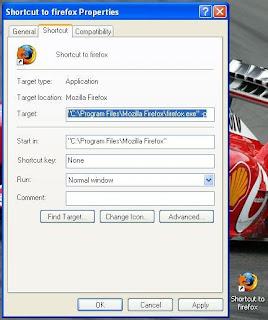
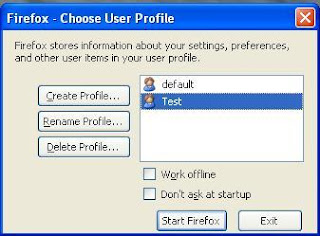
5. Open firefox icon’s properties (from desktop and quick launch). Add extension -p to command line (like “c:\program files\mozilla firefox\firefox.exe” -p). Press ok. (Screen Shot)

6. While starting firefox you have to create a new profile of firefox. (Screen Shot)

7. You can use this method for Multiple Orkut Logins from firefox too! Just use a different FF profile for different Orkut Profiles.

Error 2: (Screen Shot)

Well this error is due to the compatibility reasons of GM with Firefox. In this type of error, even clicking on the install button doesn’t install the script. The same page continues to be displayed!

What You Have to Do:

1. Check Out the Greasemonkey Addon Page on the Mozilla Firefox site. Chance are that you will get your answer there.
2. If you don’t find a solution there, instead install this tested and tried version of GM.

Error 3: (Screen Shot)

You can’t say that it is a Technical error. Because it is a lame human error. What you have done is “double clicked” a saved GM script on your PC hoping that it will install the script. But this is not the correct way of installing the script. Please refer Getting Started Post to know how to install a GM script.

Error 4: (Screen Shot)

This is just the server error on which the script that you are trying to download/install is hosted. I upload all my scripts on http://userscripts.org which is a newly build site but is going strong. Due to it’s freshness the administrator of the site frequently shuts the server down for some up gradation work. If your encounter Error 4, at any point of time then please remain a little patient and try again later.

In Addition to the above errors if you experience any other error, do feel free to contact me. I’ll try to solve it as soon as possible.

Read More..
 

Installing Extensions in Firefox

Posted In: , . By BabyFirstYear

As Firefox’s popularity has increased so has the interest in Firefox extensions or plug ins. Two questions seem to surround this topic. The first is where do I find extensions. The second is how do I download and install browser extensions. We’ll answer both items.One benefit the Firefox browser offers is the number of extensions developers have created. The number well exceeds a thousand. These extensions enhance the browser by adding features that weren’t provided in the program. Some examples of additional functionality that extensions provide Firefox users:

* Create a desktop shortcut from a webpage address
* Open the same web page you’re viewing in Internet Explorer
* Translate highlighted text on a web page into another language
* Add bookmarks to Del.icio.us
* Reopen a closed tab

Finding Firefox Extensions

While the above examples are but a small sampling, you can see more examples in various extension collections. The best known of these collections is maintained by the Mozilla foundation. The page can be accessed in two ways. The easiest method is using the Firefox browser and from the Tools menu, select Add-ons.

(Figure 1)

After you select Add-ons from the menu, a new dialog opens which lists any extensions already installed. At the bottom right, is a link to Get Extensions.

(Figure 2)

The second way to get to the extension page is to navigate to the page by entering the URL.

Installing a Firefox Extension

The basic process of installing the extension is easy, but there are some nuances. Specifically, Firefox prefers installing extensions from mozilla.com rather than a developer’s site or another extension site. It considers these extensions safer and does not block the process.

(Figure 3)

Another minor safeguard appears when you click the Install Now link. When the Software Installation dialog first appears, there is a slight time delay before the Install button becomes enabled. This is to prevent you from accidentally clicking when you didn’t mean to install the extension. The same delay happens if you were to move focus off of your browser by clicking another application. Clicking anywhere within the dialog, starts the countdown timer. The delay does not occur if you’re updating an extension you’ve installed.

(Figure 4)

After you click the Install button, you’ll see a dialog box similar to what you see when you selected Add-ons from the Tools menu in Figure 2. The main difference is you’re alerted to restart Firefox to complete the installation process.

(Figure 5)

Installing Extensions from non-Mozilla Sites

The installation process is similar except for the safeguard I mentioned earlier. In the example below, I started to install the extension directly from the no script site. One could argue that this is a trusted site since the publisher is releasing an extension that works on their pages.

Instead of immediately seeing the Software Installation dialog (Figure 4), I need to first deal with Firefox’s message. Firefox prevented this site (noscript.net) from asking you to install software on your computer.

(Figure 6)

To get around this safeguard, you need to click the Edit Options button that appears to the far right on the info bar. This will open an additional Allowed Sites dialog where you must click the Allow button to accept the web site and then click the Close button. After you’ve allowed the site, you can proceed as before.

(Figure 7)

Once you start using Firefox extensions, you start looking for more as they do make your browsing experience better. It’s almost an addiction. Like many additions, there can be problems if you have too much of a good thing. I find it’s easier to install one extension at a time and see how it interacts with others. If you were to install multiple extensions on the same day, you might have a harder time determining which one might be causing any problems. The same rule applies to other software as well and not just extensions.

You’ll also find people will blog or report about their favorite extensions. It’s easy to do a search on any popular search engine with expressions like favorite firefox extensions or best firefox extensions. This seems to be an area where a lot of people have opinions. Or, you could just use the Top Extensions or Popular category on the Mozilla page.

Read More..
 

Getting Started

Posted In: , . By BabyFirstYear

You will Need:

1. Mozilla Firefox (download from below)
2. Greasemonkey

1.1 Getting Mozilla Firefox

What you have to do is install a Browser same as Microsoft’s Internet Explorer but much better than it (as per my testings). The name is Firefox, Mozilla Firefox…
Click Here to get FireFox.

1.2 What is Greasemonkey?

Greasemonkey is a Firefox extension that allows you to write scripts that alter the web pages you visit. You can use it to make a web site more readable or more usable. You can fix rendering bugs that the site owner can’t be bothered to fix themselves. You can alter pages so they work better with assistive technologies that speak a web page out loud or convert it to Braille. You can even automatically retrieve data from other sites to make two sites more interconnected.

Greasemonkey by itself does none of these things. In fact, after you install it, you won’t notice any change at all… until you start installing what are called “user scripts”. A user script is just a chunk of Javascript code, with some additional information that tells Greasemonkey where and when it should be run. Each user script can target a specific page, a specific site, or a group of sites. A user script can do anything you can do in Javascript. In fact, it can do even more than that, because Greasemonkey provides special functions that are only available to user scripts.

1.3 Installing Greasemonkey

To start using user scripts, you first need to install the Greasemonkey browser extension.

Procedure: Install the Greasemonkey Extension

1. Visit the Greasemonkey Firefox Addon Page.

2. Click the link titled “Install Now”.

3. Firefox will indicate (probably at the top of your browser window) that it prevented the site from installing software. Click Edit options… to bring up the “Allowed Sites” dialog, then click Allow to add the Greasemonkey site to your list of sites that are allowed to install software. Click OK to close the “Allowed Sites” dialog.

4. Once again, click the link titled “Install Greasemonkey”.

5. Now an install dialog should pop up to confirm that you really want to install. Wait a few seconds for the install button to enable, then click Install now.

6. Restart your browser.

By default, installing Greasemonkey does not add any functionality to your browser. All it does is enable you to install additional items, called “user scripts”, which customize specific web pages.

1.4 Installing New Scripts

Well, though it’s easy to install a new script, still I thought that this column is a necessity. There are two easy methods to install a GM script. I’ll be stating all of them with some screen shots, so that you can understand them better.

Method 1

This one is the direct method. Normally I use this one in my blog and prefer that you too use it, but only if you trust your source. You must be online to use this method.

What You Have to Do:

1. Before Beginning please make sure that GM is active and running. If GM is inactive first make it active by single clicking on the Monkey.

2. Now first see this screen shot of one of the Orkut Addons! script and notice the Status Bar. It shows something like this “http://userscripts.org/scripts/source/9953.user.js”. This is when you can use this method! This link is the direct link to the 9953 User Script on www.userscripts.org.

3. When you click this link, an installation window will appear to confirm that you want to install the script or not.

4. Just Hit Install and you are done. If you face any error please refer GM Errors Post.

P.S. : Use this method only when you trust the source, otherwise you cookies can be leaked too!

Method 2

This method stores the GM script first on your Hard Disk and then you install it at your own convenience, and it doesn’t matter that you are online or offline.

What You Have to Do:

1. When you notice “http://userscripts.org/scripts/source/9953.user.js” in you status bar, this means that if you click this link, you’ll be installing the userscript number 9953. This is well explained in Method 1.

2. Now, for some reason, you don’t want to install the script now and first download it and then install it at a later stage. What would you do? Simple. Just follow this method.

3. Do a right click on the script link as in here. Then click on “Save Link as…”. A dialog box will appear, asking you where to save the file. Let us suppose that you save the script on your Desktop with the file name as 9953.

4. After downloading the script, just follow this instruction to open a file in Firefox (make sure that GM is active). Locate the file 9953 (as we assumed) on your Desktop (as we assumed) through the Dialog Box, and select it. Now press “Open”.

5. Now you’ll see something like this in your browser. Press “Install” and you are done. If you face any error please refer GM Errors Post.

P.S. : This method is somewhat similar to the above one with the only exception being that you can save the script for your later use in case the owner of the script deletes it.

Read More..
 

Installing Orkut Themes

Posted In: , . By BabyFirstYear

I am happy to inform you all that you will get new themes for Orkut on every Saturday from us! For more details about this program, please visit http://orkutaddons.blogspot.com/2008/03/saturday-theme-day.html


Before you go and tryout any of the themes hosted on Orkut Addons, do go through this tutorial once so that the load of queries in my e-mail inbox can be reduced.

1. Getting Stylish

What you need to use our themes is just Mozilla Firefox and Stylish. You can download Mozilla firefox from the footer of this page and Stylish from here. Stylish is a Firefox Addon to Customize the look of the application and of websites. Click here to read the tutorial to install a firefox addon from grass-root level.

After you install stylish, you will see an icon at the bottom right corner of firefox like this .
That's all! Now you have Stylish installed on your FF and it's time to install the Orkut Themes.

2. Installing Orkut Themes

Our themes will generally be hosted on Googlepages, so in most of the cases we will give you the link as http://oa.addons.googlepages.com/name.css. Here "name" is the name of the theme that would vary every Saturday. When you will click this link, a piece of code will appear in you Firefox Browser just like here.
Now what you have to do is just COPY this piece of code on the clipboard and then follow the below instructions:

1. Right click on the stylish icon, located at the bottom right of FF.
2. Point to Write Style and then click on Blank Style.
3. In the window, that opens-up write the name of the theme and paste the code that you
copied earlier in the big box.
4. Click Save and you are done!!

Visit Orkut after all these steps and you'll see the result as shown in the posts of themes! Enjoy Orkutting.

3. Deleting/Uninstalling Themes

Since you will be getting new themes every Saturday, I guess you would need to uninstall the previous one, because there is a very high probability of you falling in love with the new theme! Follow these steps to uninstall or to delete an old theme.

1. Right click on the stylish icon, located at the bottom right of FF.
2. Choose Manage Styles. Here you will get the list of all installed styles on your machine.
3. Choose the style which you want to uninstall (by a single click).
4. Click on "Delete" which is located at the top of the Manage Style Window.

4. Presenting your Thoughts

I follow the policy of "You comment I follow". So, all your respective thoughts about each and every theme are welcomed. To make the things easier, please comment about the themes in their respective commenting section. This would make me to follow up them more easily.

Read More..
 

Categories